
High-Level Information About Intune Integration
To navigate to our Intune Integration, please go to Settings > Integrations > Intune Integration
Here are some high-level notes before we get into the steps of the integration setup:
- IMPORTANT! Because of the technical knowledge required, your district’s IT administrator (or someone with a similar role) will most likely need to perform this procedure to sync Intune to Work Orders.
- Once the Intune integration is active, you will see a green banner message posted at the top of the page.
- New devices and updates to existing assets from the MDM sync nightly, while sync rule actions are processed every 30 minutes.
- Once the Intune Device is synced in, ONLY the mapped fields on the asset record can not be edited, otherwise, most fields on the Asset record will still be editable
-
Asset Creation in Work Orders
- The integration keys in on the serial number of the Intune device to uniquely identify the device.
- If the integration finds a match on the serial number, it will update the existing Work Order asset record with the information from the Intune platform, otherwise, it will make a brand new asset record
Intune Device Integration
Step 1: Connection tab in Work Orders
To use Microsoft Intune with the Destiny Resource Manager Mobile Device Management (MDM) Integration feature, you need to do some setup.
To connect Microsoft Entra to Destiny Mobile Device Management (MDM), the following three credentials are required from the Microsoft Entra admin center:
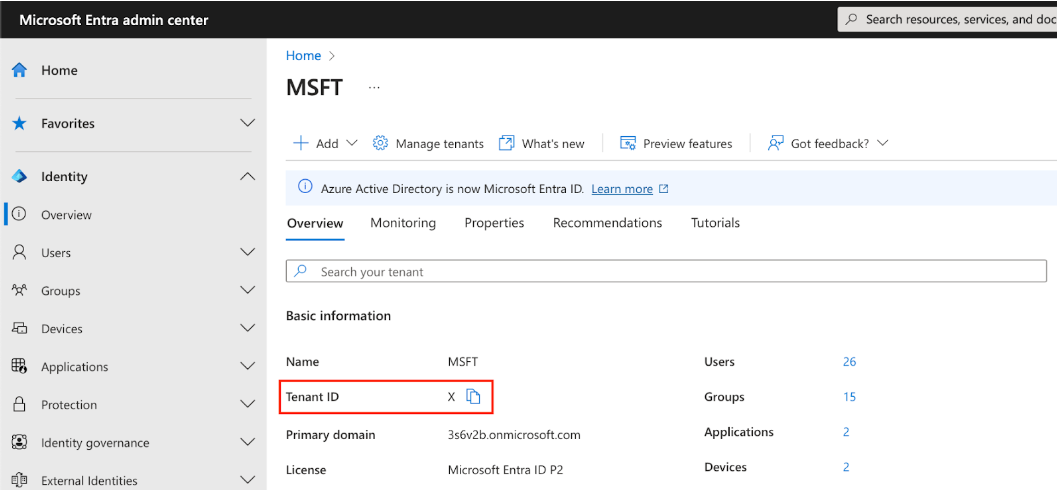
1. Tenant ID:
- To find the Tenant ID, select Identity > Overview.
2. Client ID
1. Select Identity > Applications > App Registrations
2. Enter a name, such as MasterLibrary (recommended).
3. Under Supported account types, select Accounts in this organizational directory only (MSFT only - Single tenant).
After you register, your Client ID appears under App registrations > Overview.
3. Client Secret:
1. Select Applications > App registrations > Destiny.
2. Under Manage, select Certificates & secrets.
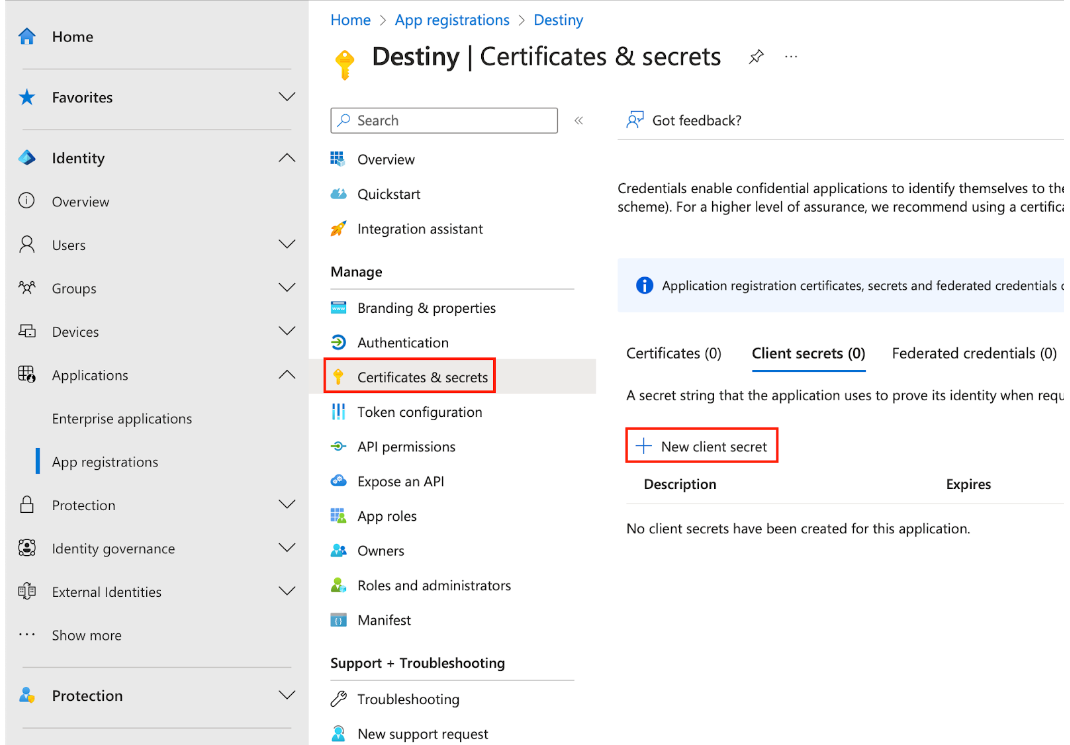
3. Click + New client secret. The 'Add a client secret' pop-up appears.
4. Enter a name in the Description field, and select an expiration date from the drop-down.
Note: Once the secret is created, its value is visible until the page is closed.
Important: Client secret values can only be viewed immediately after creation. Be sure to save the secret before leaving the page.
Once you have the Tenant ID, Client ID and Client Secret entered in the connection tab, select "Save"
API Permissions
To use all of the features available in Destiny Mobile Device Management (MDM), an application must have related privileges and access levels set up. This lets you read and write data, when needed.
1. Sign in to the Microsoft Entra admin center.
2. If you have access to multiple tenants, in the top right corner, click the settings icon,  . Then, select the desired Directory name.
3. Select Identity > Applications > App registrations > All applications and select your client application
4. Select API permissions > + Add a permission.
- Note: This is different from your web API.
5. On the Request API permissions page, click Microsoft Graph.
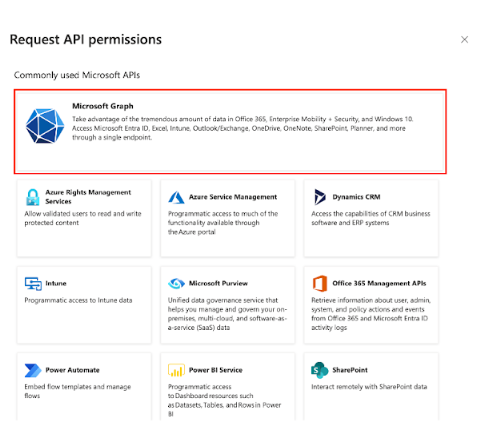
- Add the following permissions:
- User.read
- Delegated permissions:
- Application permissions:
- AuditLog.Read.All
- BrowserSiteLists.Read.All
- Device.Read.All
- Device.ReadWrite.All
- DeviceManagementConfiguration.Read.All
-
DeviceManagementConfiguration.ReadWrite.All
-
DeviceManagementManagedDevices.PrivilegedOperations.All
-
DeviceManagementManagedDevices.Read.All
-
DeviceManagementManagedDevices.ReadWrite.All
-
DeviceManagementRBAC.Read.All
-
DeviceManagementRBAC.ReadWrite.All
-
DeviceManagementServiceConfig.Read.All
-
Directory.Read.All
-
Directory.ReadWrite.All
-
Directory.Write.Restricted
-
Group.Create
-
Group.Read.All
-
Group.ReadWrite.All
-
GroupMember.Read.All
-
GroupMember.ReadWrite.All
-
Place.Read.All
After these permissions have been added, they will appear as a list of configured permissions.
Once you updated the API permissions, come back to the connection tab of the Intune Integration of Work Orders and select "Test"
You should see a "Test Passed! Account found." message, like in the below screenshot
Once your test has passed, please select the "Next" button to continue onto Step 2 "Field Mapping".
Step 2: Field Mapping tab
This integration will auto-map the serial # and the Model field to Work Orders Serial # and Model fields. The Field mapping offers customization for which field you would like to map to the Work Order Asset Name field. The following fields are options:
- Serial #
- Mobile Device Name
Note: We are keying in on the serial # field in Work Orders/Intune to indicate if a Intune device will update an existing asset in Work Orders or create a new asset record in Work Orders.
Once your field mapping is finished, please select "Next" to start your location mapping.
Step 3: Sync Rules tab
In this tab, you can customize the sync rules of how to update Intune when something happens in Work Orders.
Steps
-
Select/deselect the 'If MLW changes the asset Status to Lost, Set the device's Status in Intune to' checkbox to enable/disable from syncing. From the drop-down, select one of the following:
- Don't Change
- Cleaned
- Deleted
- Retired
- Wiped
- From the 'and Move the device to Device Category' drop-down, select Don't Move or Lost or Stolen Devices.
-
Select/deselect the 'If MLW changes the asset Status to Stolen, Set the device's Status in Intune to' checkbox to enable/disable from syncing. From the drop-down, select one of the following:
- Don't Change
- Cleaned
- Deleted
- Retired
- Wiped
- From the 'and Move the device to Device Category' drop-down, select Don't Move or Lost or Stolen Devices.
- Select/deselect the 'If MLW changes the asset Building/Space, Move the item in Intune to the mapped Device Category' checkbox to enable/disable from syncing.
-
Select/deselect the 'If MLW deletes an asset, Set the item's Status in Intune to' checkbox to enable/disable from syncing. From the drop-down, select one of the following:
- Don't Change
- Cleaned
- Deleted
- Retired
- Wiped
- From the 'and Move the device to Device Category' drop-down, select Don't Move or Lost or Stolen Devices.
- Click Save Rules.
Step 4: Sync Data tab
1. Select "+Add Device Category"
2. Select The Intune Device Category you would like to bring into Work Orders
3. Select a Building
- Note the building of the asset can change after it's synced into Work Orders. This is just the "initial" building for the assets)
4. Select a Space
- Note the Space of the asset can change after it's synced into Work Orders. This is just the "initial" space for the assets)
5. The Active Checkbox will default to being checked. Keep this checked if you want this Intune Device Category to continue its sync.
6. Select Save
7. Select OK and the sync data tab will refresh with your newly added Device Category
8. Select the icon on the right side of the grid to initiate the sync process for the Device Category
- The Sync process can take a while depending on how many devices are in your Device Category. So in the meantime, this load message will display
9. Once the sync is completed, a new prompt will display.
- Total Intune Device
- Total Devices records part of the Device Category. The other field counts should add up to this number.
- Total Asset Updated (Note - this will only display if you already have Intune devices as Assets in Work Orders)
- This count represents the number of assets in MLW that had a matching serial # in Intune and therefore were updated.
- Total Asset Added
- Newly created asset records in MLW
10. Select OK and the Sync is now set up for this Device Category!
-
NOTE: Now that the Device Category is manually synced, it will be part of the nightly sync that happens every night. If you would like to ad-hoc sync this Device Category anytime, feel free to select the
icon again
Intune Field Display in Work Orders
The following areas will display the remaining Intune fields synced in Work Orders:
- Assets -> View All Assets - there will be an Intune Icon (
) on the right side of the row.
- Assets -> View All Assets -> Selecting Asset Name link. On the main asset page there will be a Intune icon (
) to the right of the Asset Name (top left of page).
Selecting theicon at either location will open up a window with all available Intune device fields and their associated values.
Each device's "Asset Type" is determined by the operating system of the device.
Operating System = Asset Type:
1. contains "android" = Tablet
2. contains "ios" = Tablet
3. contains "ipados" = Tablet
4. contains "macos" = Macbook
5. contains "chrome os" = Chromebook
6. exactly "windows" = Desktop - PC
Checking Out Intune Assets in Work Orders
In Work Orders you can check-out synced Intune device asset records under the following conditions:
- The Intune device Asset record must have an asset status of "Available" or blank.
- Make sure the Asset Type of the Intune Device Asset record has the asset type setting checked for being allowed to be checked out.
Comments
0 comments
Please sign in to leave a comment.